

Table of Contents
Tzhaar Fight Caves
| TzHaar Fight Cave | |
|---|---|
 |
|
| Donator/Premium? | No, only for skipping waves  |
| Location | Minigame teleport → Tzhaar fight cave |
| Rewards | |
| Fire cape | |
| Type | SAFE |
| You will not lose your items on death | |
This page has a strategy guide here
All information on mechanics and strategy will be in that section.
The TzHaar Fight Cave is a safe combat minigame, where the objective is to survive 63 Waves of Tzhaar Cave's Monsters and defeat the final boss, Tztok-Jad (Level-702). Once you complete the minigame, you're rewarded with 1000 tokkul, Barrows gloves and most importantly: a Firecape.
Rewards:
 Fire cape
 Barrows gloves
 Tokkul (x1000)
When you die halfway through the minigame, there will be no rewards. Only when the Fight Caves is completed, the player will be rewarded with the three items above.
On completion of the minigame, there's also a chance at receiving:
") Clue scroll (elite) (1 in 12 chance)
Clue scroll (elite) (1 in 12 chance) TzRek-Jad (1 in 200 chance)
Note:
- Killing TzTok-Jad while having it assigned as a slayer task doubles the chance of receiving the TzRek-Jad pet (so 1 in 100).
- You can sacrifice a Fire cape to the TzHaar-Ket in front of the Fight Caves for a 1 in 200 chance of also receiving the TzRek-Jad pet.
- The Lucky TzRek-Jad pet offers +50% chance to receive an elite clue scroll after killing TzTok-Jad (so 1 in 8 instead of 1 in 12).
How do I get to the Fight Caves?


Equipment And Inventory
Magic

Helmet: Full slayer helmet > Virtus mask > Ahrim's hood > Farseer helm
Amulet: Occult necklace > Arcane stream necklace > Amulet of fury > Amulet of glory
Body: Virtus robe top > Ahrims robetop
Legs: Virtus robe legs > Ahrims robeskirt
Boots: Ragefire boots > Infinity boots
Gloves: Brawling gloves, Gloves [Barrow] > Infinity Gloves > Gloves [Dragon]
Cape: Completionist Cape > Max Cape > God cape (Zamorak, Guthix, Saradomin)
Ring: Seers ring (i) > Seers ring > Ring of Recoil
Shield: Arcane spirit shield > Divine spirit shield > Farseer kiteshield > Mages' book > unholy book
Weapon: Chaotic Staff > Staff of life > Master wand > And the best one of all the Air staff.
Melee

Helmet: Full slayer helmet* > Torva full helm > Helm of Neitiznot > Verac's helm > Berserker helm
Amulet: Amulet of fury > Amulet of glory > Amulet of strength
Body: Torva platebody > Bandos chestplate > Torag's platebody > Other high defence platebodies
Legs: Torva platelegs > Bandos tassets > Verac's plateskirt > Other high defence platelegs
Boots: Steadfast boots > Dragon boots > Bandos boots
Gloves: Brawling gloves > Gloves [barrow] > Gloves [dragon]
Cape: Completionist Cape > Max Cape > Fire cape > Trimmed skillcapes
Ring: Berserker ring (i) > Berserker ring
Shield: Divine spirit shield > Dragon defender > Dragonfire shield
Weapon: Chaos whip > Unholy whip > Abyssal Whip > Dragon Scimitar > Or if you have the cash a Godly iron scimitar
Special Weapon: Dragon claws > Armadly godsword > Saradomin godsword
Ranged

Helmet: Void ranger helm > Full slayer helmet > Pernix cowl > Armadyl helmet > Archer helm
Amulet: Amulet of fury > Amulet of ranging > Amulet of glory
Body: void knight Top > Pernix body > Armadyl chestplate > Black d'hide body
Legs: Void knight Robe > Pernix chaps > Armadyl chainskirt > Black d'hide chaps
Boots: Ranger boots > Snakeskin boots
Gloves: Void knight gloves > Gloves [barrows]
Cape: Completionist Cape > Max Cape > Ava's accumalator > fire cape
Ring: Archer's ring (i) > Archer's ring
Shield: (If using a one-handed weapon) Divine spirit shield > Eagle eye kiteshield > blessed spirit shield > unholy book
Weapon: Hand cannon > Chaotic crossbow > Rune crossbow > Karil's crossbow >
Ammo: Hand cannon shot OR Bolt racks OR Broad-tipped bolts with Diamond bolts (e) (depending on your weapon)
Fighting Each Creature
Tz-Kih (Level-22)

Priority Level: 2
Prayer: N/A
Side-Note: N/A
Tz-Kek (Level-45)

Priority Level: 3
Prayer: N/A
Side-Note: Known to hit the odd amount of damage. Level 45s will spawn into the waves. Upon their death they'll spawn 2 level 22s.
Tok-Xil (level 90)

Priority Level: 5
Prayer: Piety/Turmoil (Phase One&Two)
Side-Note: In the first Phase of the Fight Caves (See “the Waves” for phases etc.) you can pray ranged to avoid taking unnessesary damage. This monster can become a bigger threat in the second phase, and should always be killed first.
Yt-MejKot (level-180)

Priority Level: 4
Prayers: Piety/Turmoil, Protect from Melee (Phase one)
Side-Note: This NPC becomes a huge threat in phase 2, however you're forced to pray mage throughout the second phase so you'll have to keep your hit points up. You can alternately either trap Yt-MejKot behind the level 360s (if applicable to the wave you are on), or on Italy rock to provide a safe spot. This is also one of two monsters that's recommended for use of the Saradomin Godsword Special, or Soul Split whilst safespotting.
Ket-Zek (Level-360)

Priority Level: 1
Prayers: Protect from Magic(Phase 2), Piety/Turmoil(Phase 2)
Side-Note: This can be the strongest NPC in the fight caves (Besides Jad of course) if you don't protect from magic. This monster can hit constant 40s with his magical attacks, so be sure to protect magic throughout the entire second phase! This monster is also one of 2 monsters recommended for use of the Saradomin godsword spec.
The Waves
Phase 1
Wave 1: 22
Wave 2: 22, 22
Wave 3: 45
Wave 4: 45, 22
Wave 5: 45, 22, 22
Wave 6: 45, 45
Wave 7: 90
Wave 8: 90, 22
Wave 9: 90, 22, 22
Wave 10: 90, 45
Wave 11: 90, 45, 22
Wave 12: 90, 45, 22, 22
Wave 13: 90, 45, 45
Wave 14: 90, 90
Wave 15: 180
Wave 16: 180, 22
Wave 17: 180, 22, 22
Wave 18: 180, 45
Wave 19: 180, 45, 22
Wave 20: 180, 45, 22, 22
Wave 21: 180, 45, 45
Wave 22: 180, 90
Wave 23: 180, 90, 22
Wave 24: 180, 90, 22, 22
Wave 25: 180, 90, 45
Wave 26: 180, 90, 45, 22
Wave 27: 180, 90, 45, 22, 22
Wave 28: 180, 90, 45, 45
Wave 29: 180, 90, 90
Wave 30: 180, 180
Phase 2: Protect from Magic for the rest of the fight pits!
Wave 31: 360
Wave 32: 360, 22
Wave 33: 360, 22, 22
Wave 34: 360, 45
Wave 35: 360, 45, 22
Wave 36: 360, 45, 22, 22
Wave 37: 360, 45, 45
Wave 38: 360, 90
Wave 39: 360, 90, 22
Wave 40: 360, 90, 22, 22
Wave 41: 360, 90, 45
Wave 42: 360, 90, 45, 22
Wave 43: 360, 90, 45, 22, 22
Wave 44: 360, 90, 45, 45
Wave 45: 360, 90, 90
Wave 46: 360, 180
Wave 47: 360, 180, 22
Wave 48: 360, 180, 22, 22
Wave 49: 360, 180, 45
Wave 50: 360, 180, 45, 22
Wave 51: 360, 180, 45, 22, 22
Wave 52: 360, 180, 45, 45
Wave 53: 360, 180, 90
Wave 54: 360, 180, 90, 22
Wave 55: 360, 180, 90, 22, 22
Wave 56: 360, 180, 90, 45
Wave 57: 360, 180, 90, 45, 22
Wave 58: 360, 180, 90, 45, 22, 22
Wave 59: 360, 180, 90, 45, 45
Wave 60: 360, 180, 90, 90
Wave 61: 360, 180, 180
Wave 62: 360, 360
Wave 63: 702, (108, 108, 108, 108)
Note: You can check your wave progress anytime by typing ::Tz
Note 2: You can figure out the best order of killing the monsters inside of the fight caves by checking their priority level in “Fighting each monster”. The higher the priority level, the sooner you should kill that monster, while you save the monster with the lowest priority level for last.
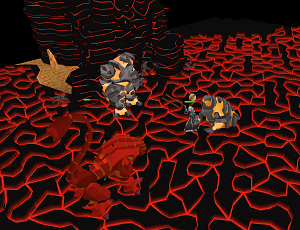
Look out, here comes Tztok-Jad!
Tztok-Jad (Level-702)

Priority Level: 6
Prayer: The Protection prayer to be used will be displayed in your chat box.
Side-Note: This is the last monster in the fight caves. When you've killed him half way, 4 Yt-HurKots to come and heal him repeatedly - the player must deal with them whilst warding off TzTok-Jad's attacks. Once killed, the healers will not re-spawn.
Congratulations! You've succesfully survived all of the 63 Waves and obtained your Fire Cape!
Original Guide's Owner: Kidz
Credits for Equipment and Inventory setups to: Swee
Uploaded to the Wiki by: Jonas
| PkHonor Quests, Achievement, and Minigame Guides | |
|---|---|
| Quests | Pest Invasion • The Last Journey • Correcting History |
| Achievements | Wise Old Man • Wilderness Achievement Diary • Combat Achievements |
| Minigames | Barrows • Castle Wars • Clan Wars • Duel Arena • Inferno • Last Man Standing • Pest Control • Risky Barrows • The Gauntlet • TzHaar Fight Caves • TzHaar Fight Pit • Warriors' Guild • Zombie Minigame |