

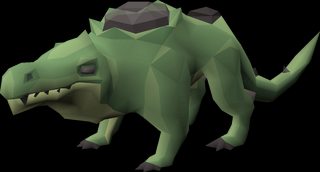
Chambers of Xeric
TODO: Add gear setups, update boss guides and loot sections after release
The Chambers of Xeric is considered a safe minigame on PkHonor. Players will not lose their items or Hardcore statuses on death.
Chambers of Xeric
The Chambers of Xeric, aka Raids 1, is a large arena located The Chambers of Xeric are located on Mount Quidamortem. The Chambers of Xeric uses a unique party finding system to help determine how strong the team is. This will affect the strength of the monsters and bosses, in addition to the requirements needed in the skilling rooms. Players can bring their own supplies in (tools not needed), but will need to utilize the chambers' resources in order to defeat the increasingly strong bosses.
To start a raid, the leader must create a team. This “team” is the leader's Clan Chat; which other players may join by manually typing in the clan chat's name or by requesting to join the chat. Once everyone is ready, the leader should enter the chambers, where a starting room is located. The raid officially starts once the leader confirms that everyone is in the room; when that happens, all the mechanics will be calculated and no one may join the instance if they were not in by the time the raid started. If the leader leaves by any means, the next leader will be whoever has the ability to kick players from the Clan Chat; if no suitable rank is found, everyone is thrown out of the instance.
There are multiple demi-bosses/resource/puzzle rooms, and a final boss in every raid. There are three floors in each raid; the final floor is always the same, housing the final boss. At the end of the first and second floors is an energy well that fully replenishes the players' energy when interacted with.
Communication and teamwork is needed for players to defeat the bosses and complete the raid.
Location
The Chambers of Xeric teleport is located in the “Minigames” section of your mage book. Once clicked select “More minigames” and you will see CoX teleport displayed as “Chambers of Xerix (Raids I). (Option 3)
Bosses
There are several bosses that can be encountered in a raid. Four to six bosses can be expected in a raid, one always being the Great Olm.
| Bosses | ||
|---|---|---|
| 1.) Tekton | 2.) Vespula | 3.) Vasa Nistirio |
| 4.) Vanguards | 5.) Muttadiles | 6.) Lizardman Shamans |
| 7.) Skeletal mystics | 8.) Great Olm (always the last boss) | |
Tekton
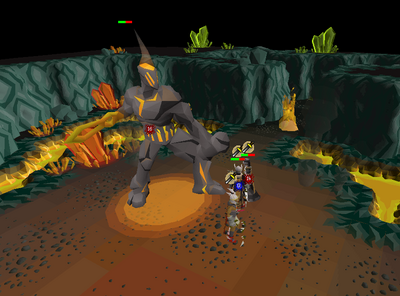
Tekton has high Defence but only uses Melee attacks. His attacks can deal heavy damage, though there is one disadvantage for him; his attacks have a small delay before they hit, meaning that a player can run corners to avoid getting hit by most of his standard attacks. However, his attacks can cleave clockwise. Tekton always starts with an orange aura around him, which has lower Defence than his red aura.
After several attacks, or if his attacks are interrupted (no-one in range), he will return to the anvil. Players under him as he returns to the anvil will take rapid stomp damage. He can still be attacked as he makes his way back to the anvil.
When Tekton goes back to the anvil, he will repair himself, recovering a percentage of his hitpoints. While he is at the anvil, he will send up to two sparks flying for each player in the chamber, which have a 3×3 AoE and will deal 10-20 damage to anyone hit by them. They can be avoided by simply running two spaces away from your current spot when the sparks are flying. After five sets of sparks, he will resume combat, this time in an “enraged” stance (red aura), dealing significantly more damage whilst having higher Defence.
Tekton should only be fought if dragon warhammers/bandos godsword special attacks are being used. These can lower Tekton's defence as his high Defence and bonuses against non-crush attacks can make him tedious to kill otherwise.
Tekton drops five stinkhorn mushrooms, two overload (+) along with a single revitalisation (+) and prayer enhance (+) upon death.
Due to Tekton's high defences, it is recommended to bring an extra weapon to target Tekton's weakness to crush.
Vespula
In the chamber will be Vespula herself, four lux grubs and an abyssal portal. The portal must be destroyed to dispel Vespula and her offspring.
Vespula has very strong poison (starting at 20 damage), so a form of poison protection is required when fighting her.
Vespula will sting the lux grubs from time to time, causing their health to degrade. If fully degraded, it will turn into a Vespine soldier, fully healing both Vespula and the portal. Therefore, it is important to prevent the lux grubs from transforming into Vespine soldiers. In the other end of the chamber are several Medivaemia blossom plants which can be picked. The blossoms are then given to the grubs to restore their health.
In a group, one member should focus on collecting the blossoms and giving it to the grubs to prevent them from turning into soldiers. The rest of the team should focus on damaging the Abyssal Portal.
To do this, players must stand on a specific row of tiles just outside of Vespula's melee range. In the image shown this is the tile just right of the right Lux grub. Players can then use their long ranged weapons to flinch the portal while using their Redemption prayer to stay alive. It is recommended to bring an extra Super restore for raids with Vespula, due to repeatedly using Redemption draining your prayer faster than normal
Vasa Nistrio
Before starting the fight, it is important that one player with low health awaken him. While this will cause flames to appear at the entrance, Vasa immediately performs his special attack upon starting the fight. Players should not stand near where the flames will show up either, as they will also be included in his special attack.
Vasa's special attack can be deadly for those unprepared. He teleports half of the team next to him, while the other half are placed randomly across the room. He will then launch multiple projectiles near him, dealing heavy damage (player's current hitpoints at that time minus 5), so it is recommended to keep health low and quickly heal up to avoid being comboed out. In groups, the players teleported to the edges of the room should activate Protect from Magic and quickly move to next to him, as it will reduce the damage of this attack to deal 50% of the stunned players' health instead.
Vasa heals himself by going one of the four crystals in the corners of his chamber. The one that he heads to will always glow, so head there and attack the glowing crystal. The crystals usually give the most points in the encounter. They are extremely resistant to non-stab attacks, so a stab weapon is highly recommended in deactivating them. Vasa will return to the middle of the room if he finishes healing from the crystal, or it is disabled by the team. On every third crystal, Vasa will walk over to it but immediately make his way back to the centre of the room, so the glowing crystal should be ignored and players whittle his health down quickly to conserve supplies.
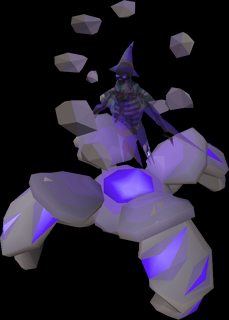
Vanguards
The Vanguards are three separate entities, so individually, they have less health compared to other bosses. The Vanguards are the only raid bosses that does not have a barrier mechanic at the entrance to their room aside from the Guardians.
Each Vanguard uses one form of attack and is weak to a different form of attack in return.
The melee Vanguard attacks a single player three times at once and Pray from Melee should be used. This Vanguard is weak to magic attacks. Because of this it is recommended for one person to bring Ice Barrage to freeze the melee Vanguard, this allows players to be able to remain out of melee range so that you take less damage and switch off Protect from Melee if you feel confident.
The ranged Vanguard will throw three rocks that deal damage in an area and Pray from Missiles should be used. This Vanguard is weak to melee attacks.
The magic Vanguard will fire three balls of lava that deal damage in an area and Pray from Magic should be used. This Vanguard is weak to ranged attacks
Damage maintenance is key to fighting the Vanguard. They have a unique healing property where all three will fully heal themselves if there is a large difference (33%, or 40% in teams of less than five) between their health. Slowly damage each Vanguard, ensuring that the damage between them is equal to prevent them from healing. While they are out of their shells, their health bar is shown to help players with damage maintenance.
After being out of their shells for a while, the Vanguard retreat back into them and shuffle around in either a clockwise or counterclockwise formation. Trample damage is only applied when they're shuffling. It is recommended for each player in a team to focus on one Vanguard, and follow it when it moves to it's new position
Although each Vanguard possesses a high Magic level, the twisted bow is ill-advised because of the health mechanic and the fact that the melee and ranged Vanguards also have high ranged defence bonuses. For this same reason using a Scythe of Virtur is not recommended, as it is easy to deal too much damage and reset the healths to 100%
Each Vanguard drops the combat potion (+) of their combat style, along with Xeric's aid (+), Revitalisation (+) and at least one Overload (+) with the potential to up to 3.
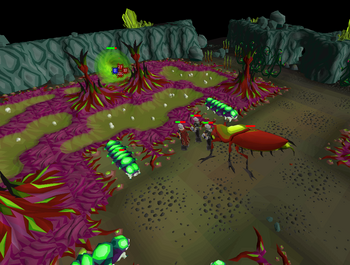
Muttadiles
Upon starting, several noxious tendrils will appear which deal damage to players who try to leave the chamber. There are also two Muttadiles; a small one walking around the chamber, and a second, larger Muttadile lurking in the water. A meat tree is also nearby.
The small Muttadile only attacks with both Melee and Ranged, while the larger one uses all three and has a special shockwave attack that can deal massive damage; however, this attack is only used against players in melee range. During the fight with the small Muttadile, the larger one will occasionally attack players in the chamber with Magic. Both can do large damage in melee range, so remain at a distance wherever possible
When the Muttadile reaches around 40-50% of its health, it will go to the meat tree and eat from it to restore health. A common way of speeding up kills is to successfully freeze the Muttadile in place and continue attacking it until it stops going for the tree. For this reason, the Zamorak godsword or Ice Barrage is useful. With Ice Barrage being recommended against the small Muttadile and using the Zamorak godsword special attack against the larger Muttadile as it possesses a high Magic level. This shouldn't be done if Tekton is the next room, as being able to use a special attack there is more important. Muttadiles will eat from the tree up to three times (each time consisting of two bites), after which they will not eat from it anymore. It is possible to trap the Muttadiles to prevent them from eating the meat tree, though this usually requires a bit of effort and is not quite reliable, especially for the smaller one. The larger one often tends to get stuck on a root depending on the layout of the room and its position.
Once the small Muttadile dies, the larger one will emerge and attack. Use ranged against both Muttadiles (blowpipe against the smaller, Twisted bow or blowpipe against the larger) and avoid being within melee distance of them, while using Protect from Ranged. Muttadiles should be killed carefully, as while they're significantly easier compared to the other bosses, their erratic behaviour can easily kill a careless player.
The small Muttadile drops an Overload (+) and Prayer enhance (+) upon death, while the larger one also drops those alongside a Xeric's aid (+) and Revitalisation (+).
Lizardman shamans

A small room filled with at least two lizardman shamans (dependent on party size) are in the room, with several spawns blocking the way forward. They share the same mechanics as the shamans outside. The strength of the shamans is also dependent on the party size. These shamans do not require 100% Shayzien favour in order to kill
There are several layouts for the shaman room. When nearing a room with lizardman shamans, one or two sets of spirit tendrils will appear, to avoid players from safespotting them away from the chamber. The chamber itself does have safespots against the shamans, though players will need to attack the shamans first in order to lure them. It is recommended to use a crossbow or Twisted bow against the shamans, because the additional range makes dodging the shamans' attacks significantly easier. More experienced players can use their blowpipes on the shamans, but they must be careful not to make them jump, or take unnecessary damage. Lizard Shamans can poison with their attacks, so you should bring antipoison to raids featuring them
The shamans drop seeds upon being killed.
Skeletal mystics

In this room, there is a varying amount of Skeletal mystics left behind to perform sacrifices for the dark altar. The mages attack with magic from distance, and melee if players get close to them. The mages take the player's overhead prayers into account. However, if the mage cannot melee the player, they will focus on magic instead. In some areas of the chamber, it is possible to trick the mages into attempting to use melee, but is not recommended as the mystic is likely to target another player and make the safespot useless.
Protect from Magic reduces the mystics' accuracy and damage by roughly 50%. The salve amulet(ei) should be brought to raids with Skeletal Mystics as it significantly speeds up the completion of this room.
Kill all the mystics before proceeding. The strength and number of mystics is dependent on the party size. The toxic blowpipe does the most damage but the reduced attack range may lead to multiple mages attacking the player at the same time. Whenever possible use a toxic blowpipe, otherwise use a longer range weapon such as a twisted bow or crossbow. In general, killing the mystics faster means conserving more supplies than aggroing fewer of them.
The mystics drop seeds upon being killed.
Great Olm
The Great Olm is the last boss in the raid.
For small teams (1 to 7 players), the Great Olm only has three phases. This section assumes that the team has seven or fewer players.
Before starting, ensure that you have all of your equipment and supplies required for Olm, as you cannot leave the Great Olm's chamber unless you die.
Olm will start either on the west or east side of the chamber. It will also start with one of three powers; fire, acid, or crystal, which determines the special attacks it uses. To force the Great Olm into the next phase, both hands must be disabled. His left hand is weak to melee attacks, while his right hand is weak to magic. Attacking his head on any non-final phase is highly discouraged, since he will automatically regenerate health and it yields no points.
Fire is the most dangerous mechanic, as it is the only attack with extremely high killing potential due to Olm's high damage, especially if the player is unfortunate enough to get stuck in a fire wall and Olm performs a teleport attack at the same time. This is less of a threat in group encounters, but in solo encounters it is dangerous if the player lacks water spells to break out.
During the first two phases, if the left hand takes too much damage, Olm will temporarily clench it. This prevents it from performing special attacks (lightning, crystal and teleport), but it cannot be harmed. Olm will loosen its grip after a set amount of time has passed, or if the right arm is disabled. If the left hand is disabled first, it will simply prevent Olm from performing any special attacks for the remainder of the phase; this is unfeasible as it will clench very often.
“Blind spots” exist against Olm. This is only useful for soloing, as it requires unnecessary coordination in larger groups. By running in specific spots, Olm moves its head accordingly in order to “see” the player. In addition to preventing Olm from attacking, it also skips an attack in the process - for example, if the player uses a blind spot when Olm has already attacked twice after its lightning attack, it skips the teleport attack. Using the blind spots while attacking Olm requires practice; the right hand is considerably easier than the left. Players can use a 1:0 or 4:1 attack pattern on the left hand; 1:0 is a beginning method where the player attacks once with a slow weapon such as an elder maul while preventing Olm from attacking. It is considerably slower than the 4:1 attack pattern since the player uses a faster weapon like an abyssal tentacle.
In groups of three or more, the middle player(s) are designated as the “head” runner(s), moving left and right to shift Olm's attention on both sides. Runners do not need to use as many supplies, and as a result, drop supplies to any players that may need them.
When forced into the next phase, Olm will retreat back underground and shake the cavern. Crystals will fall from above, dealing moderate damage covering a 3×3 radius, with shadows indicating where they will fall. One crystal will always target a player in the room, but it can be easily avoided. After enough time has passed, it will appear on the other side and start using a new power alongside its old powers.
In the penultimate phase (when its head glows with a green aura), both arms must be disabled simultaneously to force Olm into the next phase. Weaken one hand; when that hand is on low health, focus on the other hand and disable it. In most cases, this means weakening the right hand and disabling the left hand. Once a hand is disabled, Olm loses control of it. A bar will appear over that gap; if filled before the other hand is disabled, Olm will regain control of its disabled hand with full health. The restored hand does not yield any points either.
In the last phase, Olm will attempt a final stand. The head can now be attacked, as its regeneration property is removed. Olm will use all mechanics from the previous phases (barring the teleport attack), instead getting the ability to sap health. When it does this, Olm sends out two blue projectiles at two random tiles in the room; when on top of them, it protects the player(s) from its sapping attack. Players should move continually during this phase, but not in an erratic way, as crystals continually fall from above until Olm is killed. Players should keep their health high to avoid being killed from the increased sources of damage.
Once killed, the crystal surrounding the chest shatters and players can claim their rewards from there before returning to the surface.
Puzzles
Crab Puzzle
Typical layout of a crab puzzle room. In this chamber are several Jeweled Crabs which cannot be killed by conventional combat. The main purpose of these crabs is to reflect orbs that the carved sculpture nearby emits. Getting hit by the orb will deal 10-30 damage onto the player that blocked its path. The crabs deal reasonably high damage, so use Protect from Melee while luring them into place.
The goal is to turn the coloured crystals in the chamber white. The crystals on the crabs can be attacked to change colour; red for melee, blue for magic, and green for ranged. The white orb emitted from the carving must be reflected off the crabs in the room to hit the crystals. Note that a coloured orb cannot change colour again - if a green orb hits a red crab, it will disappear.
The crabs can be temporarily bound in place with a standard hammer. One of these will spawn at the start of the room. The dragon warhammer or elder maul can also be used to bind the crabs, but it must be wielded first. Note that the crab's crystals will turn red temporarily when hit by it.
All layouts require the use of three crabs. The more players in a raid, the more crabs will be present in the room. Excess crabs should be distracted with other players as they often wander into the orb's path and potentially disrupt it.
Ice demon
An ice demon is blocking the way further into the cavern. It cannot be attacked immediately, due to the cold protecting it. It must be warmed up to force it out of its spot. There are four braziers surrounding the demon, and up to four unattackable icefiends (one for each player) that will try to extinguish any flames set by the team. The icefiends do not move from their spot, so they can only focus on the brazier in front of it.
There is an infinite tinderbox and bronze axe spawn in the room, to save players time from killing scavengers for it.
Multiple saplings are nearby which can be cut for kindlings. In team raids simply cut enough kindlings to fill your inventory and light one brazier and repeat (filling the same brazier each time) all players fill the same brazier until the ice demon is completely thawed.
Once thawed, the icefiends die and the demon moves out of its spot, becoming attackable. It uses AoE attacks; a small snowball and Ice Burst. If Protect from Magic is used, it will only focus on Ice Burst, while if Protect from Missiles is used, it will simply throw snowballs instead. Both attacks have a 3×3 AoE, but the Ice Burst attack can occasionally freeze. It is highly recommended to keep Protect from Missiles active, to prevent the demon from using Ice Burst, in addition to reducing the demon's snowball attack by roughly 50%.
The ice demon has very high defence and has damage reduction against all but fire spells. If possible, use high level fire spells, such as Fire Surge (especially useful when used in conjunction with a tome of fire). Otherwise use defence-reducing special attacks if Tekton is not the next toom and range using either a twisted bow (preferred) or a toxic blowpipe.
Thieving Puzzle
Players search for cavern grubs within the chests. A corrupted scavenger blocks the path and must be fed cavern grubs until it becomes full and tired. Cavern grubs can be found by opening many of the chests located in the room. The scavenger's hunger level can be tracked with the bar above its head.
The chests have a chance of containing the cavern grubs required, though it may instead contain unhatched cocoons. These odds are dependent on the player's Thieving level. Thieving is required to open the chests, though experience is only gained when grubs are collected. The chances a chest opening depends on whether the player has a lockpick or hair clip. The prior are dropped by other Scavenger beasts found throughout the raid.
One of these chests always contains a one-time loot of five psykk bats. A few chests may contain poison which is released when opened, dealing 1-3 damage to anyone next to the chest. This does not inflict poison on the player (nor will poison immunity prevent it). Remember which chests contain poison, as the poison chests will automatically lock itself like the grub ones.
If run energy is a concern, find a cluster of three to four chests that are placed in a way that the player only needs to walk 1 square to reach the next chest to save run energy. All layouts have at least one of these clusters. If that is not possible (due to one of those chests being poisoned), simply walk around the room and open the chests as you go.
When players have at least 10 grubs collected, start feeding the scavenger, then continue collecting more. The scavenger's health bar will start regenerating if it hasn't been fed for at least one minute after it stopped eating. In a solo raid, 30 grubs will be needed to make the scavenger sleepy provided this doesn't happen.
While these rooms are fairly easy with no risk of dying, they are often skipped because they take a considerable amount of time compared to the other puzzles.
Players can search the creature keeper to obtain his journal.
Tightrope Puzzle
The tightrope must be crossed to obtain the keystone. A group of deathly rangers and mages stand on a platform with a tightrope running in between. They must be attacked with either ranged (toxic blowpipe) or magic in order to damage them. Both groups frequently hit through prayer, but protection prayers reduce the damage. A keystone must be grabbed from the other side to dispel the barrier leading deeper into the dungeon. The tightrope requires Agility in order to cross, the level requirement of which is determined by the party's average.
While they are tolerant to players, if any player attempts to cross the tightrope, they will immediately attack the crosser, unless they are fighting another player. For this reason, all enemies should be killed or distracted to allow the crosser to go through safely. After crossing the tightrope, all damage is inflicted in one tick, so it is possible for players to be instantly killed if they attempt to cross the rope with enemies attacking them.
The mages should be killed first, as while they are just as accurate as the rangers, their max hit is significantly lower. When dealing with rangers in a group, one player should aggro the selected target before hiding behind an obstacle. This prevents the ranger from attacking as much. The “tank” should take a hit every three to four blowpipe hits to ensure that the ranger does not change aggro to an attacker.
Protect from Magic/Missiles does not provide full protection - it simply reduces the deathly opponents' damage by 50%.
When the keystone is used on the barrier, any surviving enemies will be automatically killed.
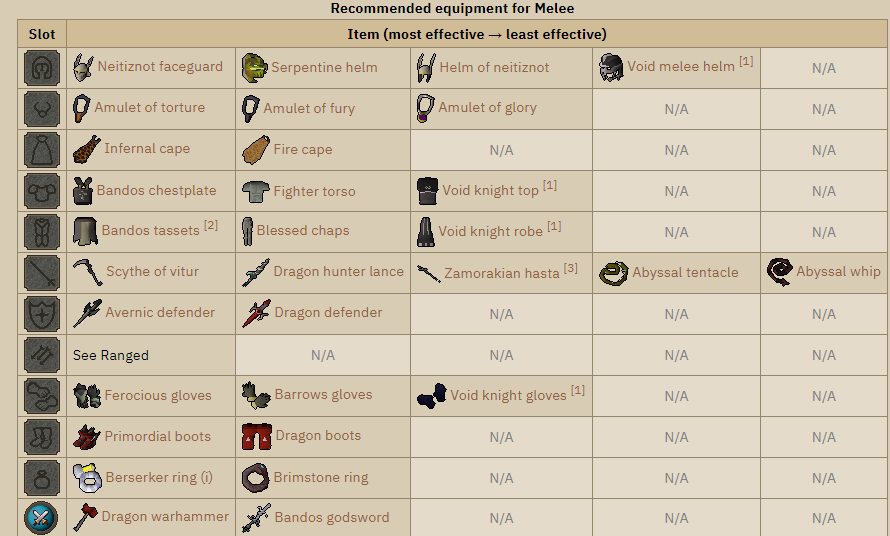
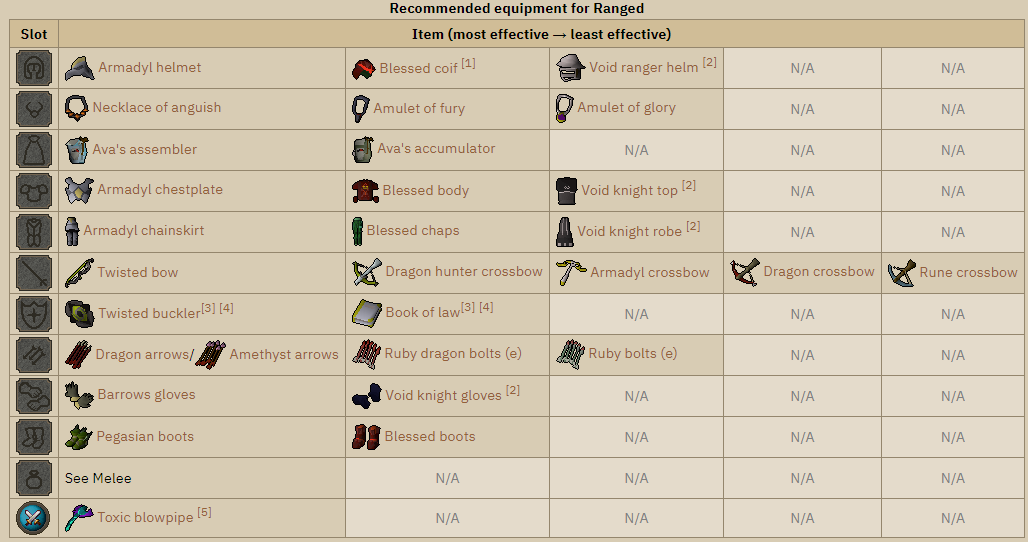
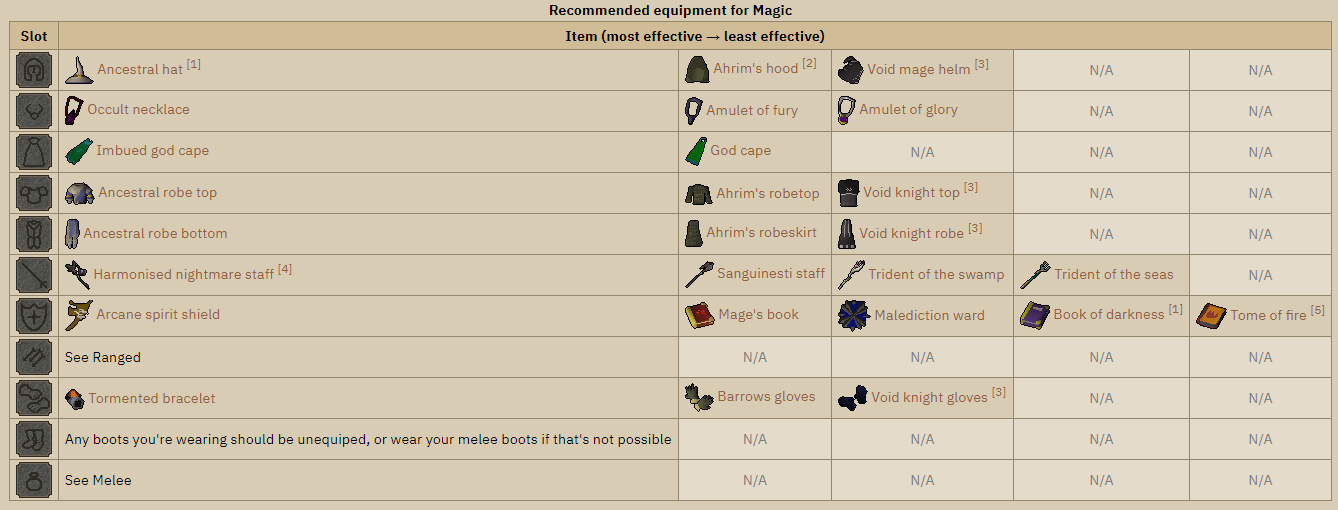
Gear Setups
Best-in-slot Meele
Best-in-slot Range
Best-in-slot Magic
| Unique Rewards | |||
|---|---|---|---|
| Item | Quantity | Droprate | |
 | Rigour+ scroll | 1 | 34.48% |
 | Augury+ scroll | 1 | 34.48% |
 | Twisted Buckler | 1 | 6.90% |
 | Dragon hunter Crossbow | 1 | 6.90% |
 | Dinh's Bulwark | 1 | 2.07% |
 | Ancestral Hat | 1 | 2.07% |
 | Ancestral Robe Top | 1 | 2.07% |
 | Ancestral Robe Bottom | 1 | 2.07% |
 | Dragon Claws Imbue kit | 1 | 2.07% |
 | Elder Maul | 1 | 2.30% |
 | Kodai Insignia | 1 | 2.30% |
 | Twisted Bow | 1 | 2.30% |
 | Olmlet | 1 | 1/53 |
Aside from a number of supplies, you have a chance to obtain a unique reward from the Chambers of Xeric, depending on the amount of participation points you have at the end. These points are awarded for dealing damage to raid monsters and completing a number of tasks. For each 5,784 points, you have a 1% chance to receive a unique reward.
When a purple is rolled there's a:
- 20 in 29 chance to hit the prayer scroll table, then it will pick either augury+ or rigour+ at random
- 4 in 29 chance to hit the dragon hunter crossbow & twisted buckler table, then it will pick one of the two items at random
- 3 in 29 chance to hit the ancestral + d claws + dinh's bulwark table, then it will pick one of the five items at random
- 2 in 29 chance to hit the ultra rare table, then it will pick one of the three ultra rare items (elder maul, twisted bow, kodai wand)
Common drops: If no unique has been rolled for a player, it will roll the common drops table, which contains 24 different rewards, each with equal probability, since it rolls 2 unique rewards, that means the first reward will have probability of 1 in 24, then the second reward has a probability of 1 in 23. Additionally, if a player doesn't already have an elite clue, and has at least 5000 raid points, there is a 1 in 12 chance to get an elite clue. The amount of a common reward a player receives is calculated as follows:

| Common Rewards | |
|---|---|
| Item | Maximum Quantity |
| Crystal Key | 1 |
| Dragonkin Lamp | 1 |
| Uncut Onyx | 1 |
| Gold ore (noted) | 2517 |
| Steel bar (noted) | 3215 |
| Coal (noted) | 2787 |
| Runite ore (noted) | 2036 |
| Adamantite ore (noted) | 2153 |
| Wrath rune | 10330 |
| Law rune | 14325 |
| Cosmic rune | 8274 |
| Soul rune | 12583 |
| Pure essence (noted) | 21354 |
| Mahogany plank (noted) | 1685 |
| Torstol (noted) | 1352 |
| Super combat potion (4) (noted) | 255 |
| Saradomin brew (4) (noted) | 1278 |
| Anti venom(+) (noted) | 203 |
| Uncut dragonstone (noted) | 347 |
| Dragon arrowtips | 648 |
| Rune arrow(p++) | 9362 |
| Living minerals | 2093 |
| Rocktail (noted) | 1092 |
| Coins | 500,000,000 |
Further explanations can be found at this forums thread: https://forums.pkhonor.net/viewtopic.php?f=134&t=84197&p=745820#p745811